
Does your Wi-Fi randomly stop working, forcing you into the all-too-familiar ritual of a router reboot? Do your smart lights and speakers develop amnesia, constantly disconnecting from the network? Before you throw your router out the window, know this: you can likely fix these issues yourself. This guide will walk you through the essential steps, from simple physical tweaks to advanced settings, to get your network running at peak performance.
Part 1: The Physical Foundation - Location is Everything
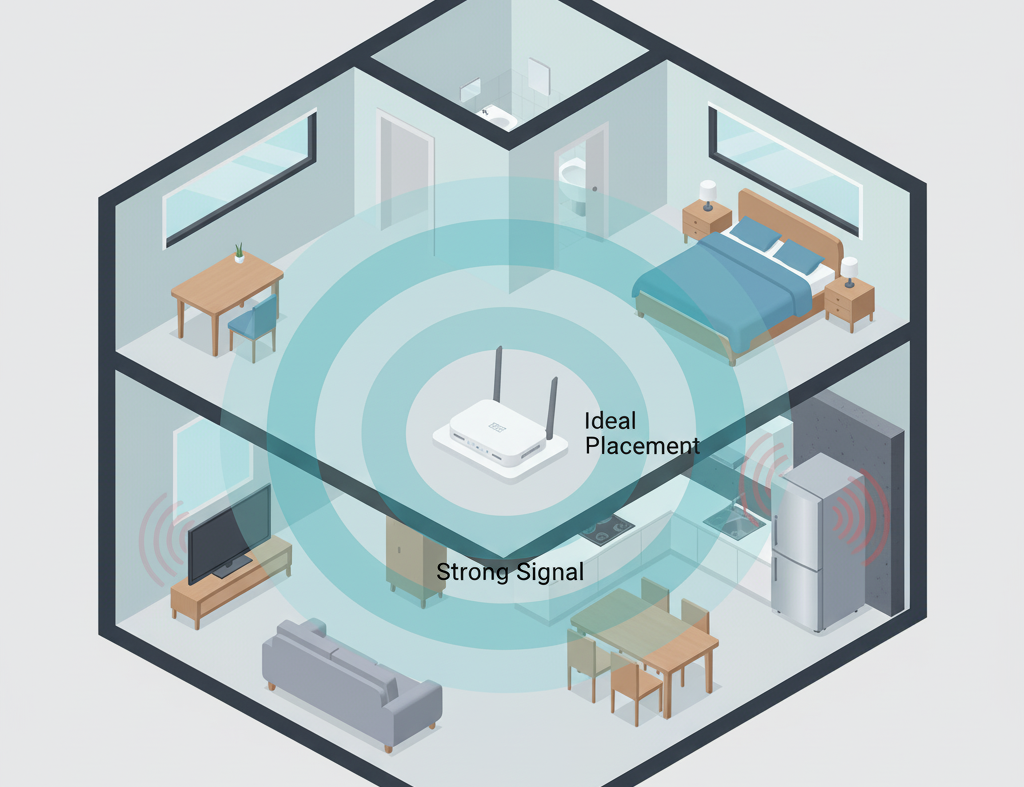
Before you touch a single setting, let's talk about real estate. Your router's physical location is the single most significant factor in your Wi-Fi's performance. Radio waves are powerful but susceptible to obstacles and distance.
Top Placement Tips:
- Go Central: Place your router as close to the center of your home as possible to provide the most even coverage.
- Get Some Air: Elevate your router. Don't hide it on the floor in a corner. Placing it on a shelf or desk allows the signal to travel more freely over furniture.
- Avoid Obstacles: Keep it away from thick walls (especially concrete and brick), large metal objects (like filing cabinets or refrigerators), and water (like aquariums). These materials are notorious signal killers.
- Antenna Awareness: If your router has adjustable antennas, position them for optimal coverage. A good rule of thumb is to have one vertical and one horizontal to cover devices on different planes.
Part 2: Is Your Router Living in the Past?
Technology moves fast, and a router that's more than 4-5 years old might be the bottleneck of your entire network. Newer Wi-Fi standards offer faster speeds, better range, and, most importantly, are designed to handle the dozens of devices in a modern smart home.
A Quick Guide to Wi-Fi Standards:
| Standard | Also Known As | Bands | Recommendation |
|---|---|---|---|
| 802.11n | Wi-Fi 4 | 2.4 GHz | Obsolete. Upgrade immediately. |
| 802.11ac | Wi-Fi 5 | 5 GHz | Still functional, but consider an upgrade for a busy smart home. |
| 802.11ax | Wi-Fi 6 | 2.4 / 5 GHz | The current sweet spot for performance and price. |
| 802.11ax | Wi-Fi 6E | 2.4 / 5 / 6 GHz | Excellent choice, adds the super-fast 6 GHz band. |
| 802.11be | Wi-Fi 7 | 2.4 / 5 / 6 GHz | The latest and greatest. Future-proof but premium-priced. |
How to check? Look for the standard on the router itself, its box, or Google the model number. If you see "Wi-Fi 5" or "AC" (e.g., AC1900), you're on Wi-Fi 5. If you see "Wi-Fi 6" or "AX" (e.g., AX6000), you're on Wi-Fi 6.
Part 3: Diving into the Router's Brain
Now it's time to roll up your sleeves and tweak some settings. You'll need to access your router's administration page. This is usually done by typing an IP address like 192.168.1.1 or 192.168.0.1 into your web browser. The correct address and login details are often printed on a sticker on the router itself.
First, Update Your Firmware!
Before you do anything else, check for a firmware update. This is like updating the operating system for your router. These updates often include crucial security patches, bug fixes, and performance improvements. Look for a "Firmware Update" or "Router Update" section in the settings.
The Channel Congestion Problem (Especially for Apartment Dwellers)
Imagine Wi-Fi channels as lanes on a highway. If everyone is driving in the same few lanes, you get a traffic jam. This is exactly what happens in apartment buildings or dense neighborhoods where dozens of Wi-Fi networks are competing for air space. Your router might be stuck in a congested channel, causing slowdowns and drop-outs.
Step 1: Analyze the Airwaves
You need a tool to see which channels are congested. Download a Wi-Fi analyzer app on your phone or laptop.
- Android: WiFi Analyzer (open-source) is a fantastic and free option.
- iOS: Apple's restrictions make this tricky. The best tool is Apple's own AirPort Utility. After installing, go to your iPhone's Settings > AirPort Utility > and enable "Wi-Fi Scanner". Then, you can use the app to scan for networks and see their channels.
- Windows/Mac: Tools like NetSpot or inSSIDer offer more detailed analysis.
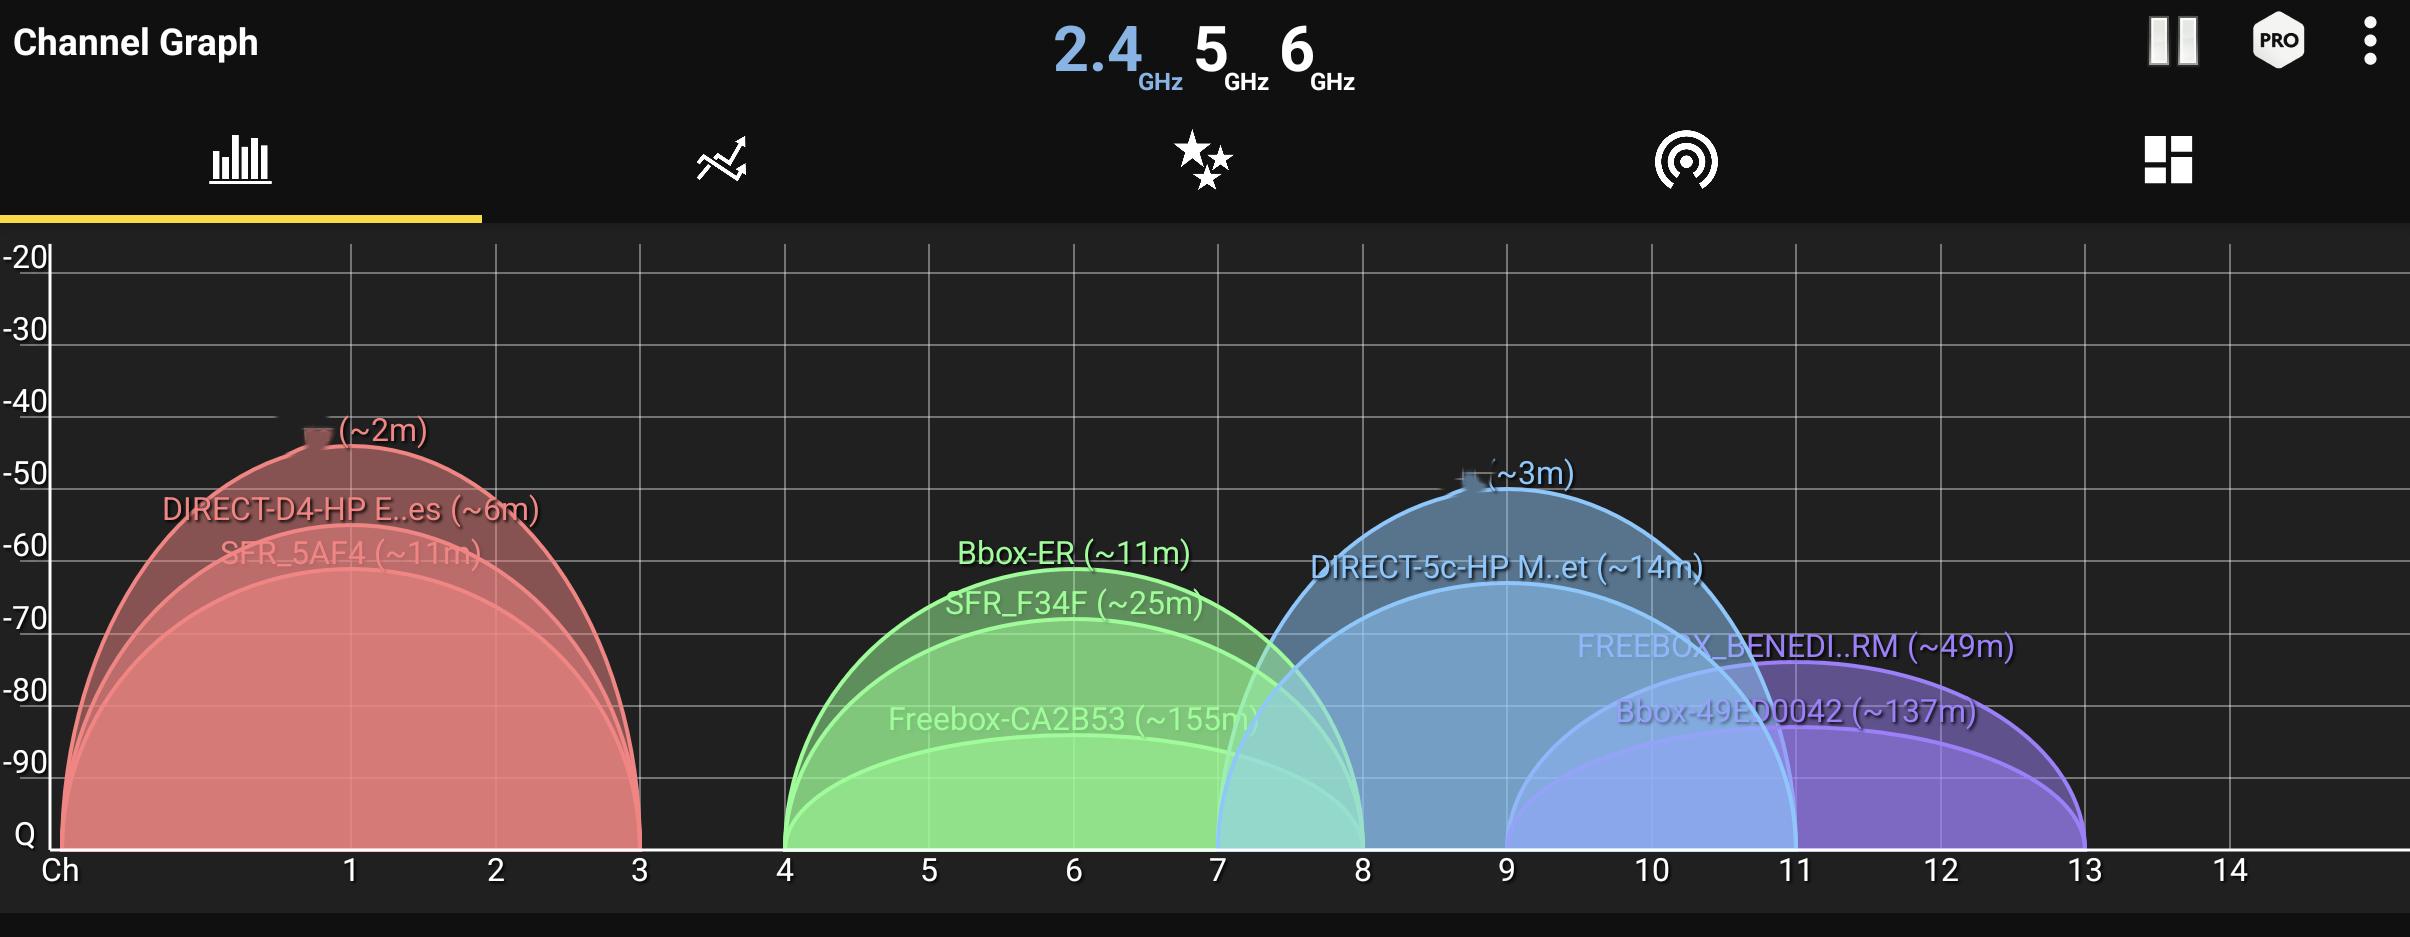
An analyzer app shows you which channels are crowded by neighboring networks.
Step 2: Change Your Channels
Once you've found the least crowded channels, log into your router's settings and find the "Wireless" or "Wi-Fi" section. You'll be able to set the channels manually.
- For the 2.4 GHz band: This band is the most crowded. The best channels are 1, 6, and 11 because they don't overlap with each other. Pick the one with the fewest networks on it.
- For the 5 GHz band: This band has many more channels and is less congested. Your analyzer will show you which channels are clear. Often, setting this to "Auto" works well, as modern routers are good at picking the best one.
- For the 6 GHz band (Wi-Fi 6E/7): This is a brand new, wide-open highway. Congestion is not an issue here. Leave it on "Auto".
Split Your Bands for a Smarter Home
Most modern routers use "band steering," which broadcasts a single Wi-Fi network name (SSID) and automatically moves devices between the 2.4 GHz and 5 GHz bands. While clever, this can confuse some smart home devices, which are often designed only for the 2.4 GHz band. This can be a major cause of smart bulbs and plugs dropping offline.
Pro Tip: Create Separate Networks
In your router's wireless settings, disable "Smart Connect" or "Band Steering." Then, give your 2.4 GHz and 5 GHz bands different names. For example:
MyHomeNet_2.4GHzMyHomeNet_5GHz
Connect all your smart home gadgets (plugs, lights, thermostats) to the 2.4 GHz network for stability and range. Connect your high-performance devices (laptops, phones, smart TVs, game consoles) to the 5 GHz (or 6 GHz) network for maximum speed.
Part 4: Expanding Your Reach - When One Router Isn't Enough
If you live in a large or multi-story home, or one with thick walls, a single router might not be able to cover every corner. If you have persistent "dead zones," it's time to expand your network.
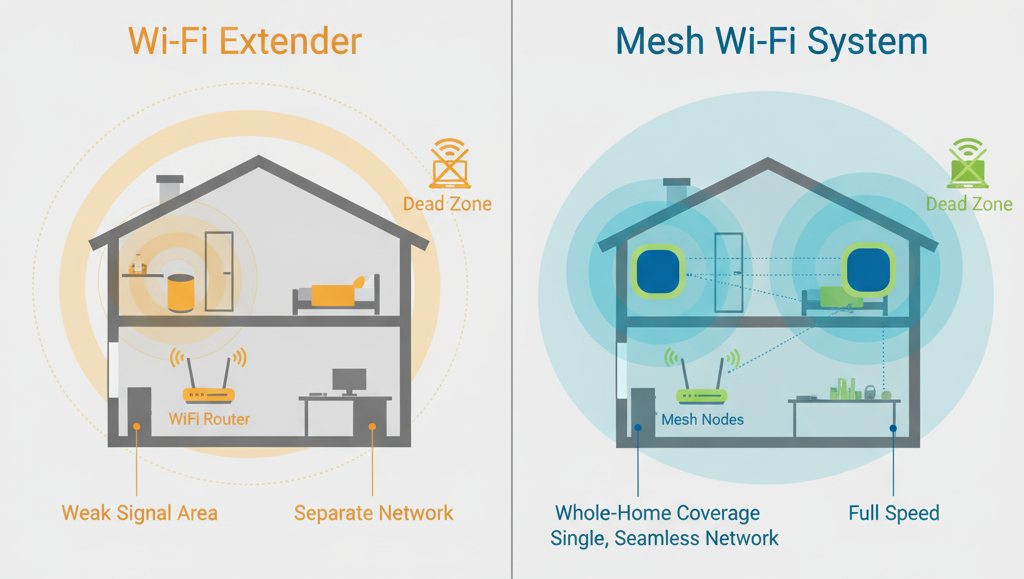
Option 1: Wi-Fi Extenders
Extenders (or repeaters) are simple devices that pick up your existing Wi-Fi signal and rebroadcast it. They are cheap and easy to set up, but they have a major drawback: they typically cut your Wi-Fi speed in half for any device connected to them. They are best for covering a single, non-critical dead zone.
Option 2: Mesh Wi-Fi Systems (Recommended)
A Mesh system is the modern solution for whole-home coverage. It replaces your single router with multiple "nodes" that you place around your home. These nodes talk to each other to create a single, seamless, and powerful Wi-Fi network. Your devices will automatically connect to the strongest node as you move around. This is the best solution for most large homes.
Part 5: Advanced Tweaks & Best Practices
If you've covered the basics and want to fine-tune your network even further, these advanced settings can provide a noticeable boost.
Prioritize Traffic with QoS
Quality of Service (QoS) is a feature that tells your router which devices or applications are most important. When network traffic gets heavy, QoS ensures that your top priorities (like a work video call or an online game) get the bandwidth they need, preventing lag and buffering. Look for QoS settings in your router's advanced options and set your most critical devices to the highest priority.
Go Wired When You Can
Remember, the fastest and most stable connection is always a physical one. For stationary, high-demand devices like a gaming console, a smart TV for 4K streaming, or a desktop PC, an Ethernet cable will always outperform Wi-Fi. This also frees up wireless bandwidth for your mobile devices.
Automate the Reboot
The classic "turn it off and on again" works for a reason—it clears the router's memory and resolves minor software glitches. Instead of doing it manually, plug your router into a simple smart plug. You can then schedule it to automatically turn off and on once a week at 3 AM, keeping it running fresh without you having to think about it.
Beware of Other Electronics
Your Wi-Fi isn't the only thing using radio waves. Other household devices, especially those on the 2.4 GHz frequency, can cause interference. Keep your router away from microwave ovens, older cordless phones, and even some Bluetooth speakers and baby monitors to ensure a cleaner signal.
Conclusion: You're in Control
Optimizing your Wi-Fi doesn't have to be a dark art. By following these steps—ensuring proper placement, using modern hardware, picking the right channels, and fine-tuning advanced settings—you can solve the vast majority of common Wi-Fi frustrations. Enjoy the smooth streaming, responsive gaming, and stable smart home you deserve!


